Effective underfloor heating preparation is the foundation of a successful and efficient installation. If you’re planning to install electric or water-based underfloor heating, preparing your floor properly will help ensure the system performs well, is protected, and avoids costly issues down the line.
This simple step-by-step guide covers everything you need to know about how to prepare your floor for your underfloor heating installation, from cleaning and insulation to levelling and moisture control.
Please note: This guide is for solid floors only.
Why Underfloor Heating Preparation Is Needed
Skipping or rushing floor preparation can result in:
- Reduced system efficiency
- Uneven heating
- Damage to floor coverings
- Delays in installation
Careful underfloor heating preparation maximises system performance and prolongs its lifespan, so it’s important to follow our recommendations and take care when preparing your space for a new underfloor heating system.
What to Do Before You Start Underfloor Heating Preparation
Before starting your underfloor heating preparation, there are a few things you need to do to ensure the space is ready, ultimately meaning the process will be smoother and more efficient.
- Confirm your floor type: This guide is for solid floors only, so before you continue, please make sure your floor type is compatible with this guide.
- Check moisture levels in your floor: Your floor needs to be dry enough before you begin installing your system and laying screed. You can check moisture levels using a moisture meter.
- Make a room plan: Mapping out where your furniture will go is an important part of underfloor heating preparation, as you want to avoid heavy objects such as bathtubs and kitchen islands directly above pipes.
Preparing Your Floor for Underfloor Heating Step-By-Step Guide
Step 1: Clean and Assess the Subfloor
The first step in preparing your floor for underfloor heating is thorough cleaning. It's essential to clean away any dust, grease, and debris ahead of your installation to make sure your system can be fitted properly and runs effectively. Here is a checklist of things to watch out for when cleaning, and why they make a difference:
- Dust, grease, and debris can prevent adhesives from working properly, meaning your system could become insecure.
- Old adhesives or coverings make the surface uneven, making it especially difficult to install your underfloor heating system.
- Any loose or unstable materials, such as loose tiles or flaking paint, could affect the stability of your underfloor heating system.
The subfloor must be sound, clean, and ready to support insulation boards and other heating components.
Step 2: Fit Insulation Boards
Now that your floor is clean and clear, the next step of your underfloor heating preparation is to fit the insulation boards neatly and stably, ideally with all gaps and joints taped. Sand or similar can be used beneath the boards in places of movement to ensure stability. Proper underfloor heating preparation like this helps to create a solid, structurally sound base. See pictures below.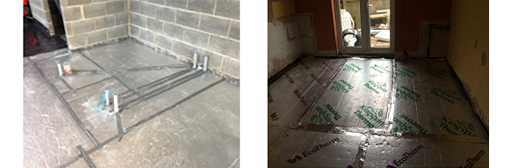
Step 3: Ensure a Levelled Floor Surface
If using liquid screed, a membrane of between 500 and 1000 gauge must be laid as crease/fold free as possible, with all joints taped and no gaps. The membrane should lap up the wall by approx 100mm with the corners folded/cut/taped neatly. This step is essential in underfloor heating floor preparation, as it helps to protect against unwanted moisture, meaning your system is more durable and long-lasting. See pictures below.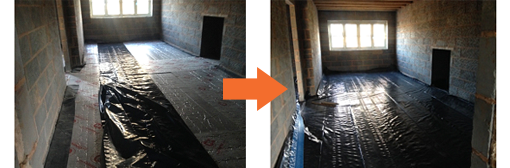
Step 4: Fit the Perimeter Insulation
As part of underfloor heating preparation, perimeter insulation should be fitted around all walls (also over the 500 gauge membrane if applicable). If using liquid screed, pull the plastic skirt out and tape the skirt to the membrane. Then, tape all joints in the membrane, which is an essential part of preparing your floor for underfloor heating. See pictures below.
Step 5: Plan for Expansion and Edge Insulation
If the pipe is to be routed through walls, there should be a suitably sized hole(s) for this with conduit around the pipe to protect it. You can use expanding foam or similar to fill in afterwards. This is an important step when preparing your floor for underfloor heating, as it helps to prevent damage to the pipe and reduces heat loss. See the picture below.
Step 6: Select a Compatible Floor Covering
After your underfloor heating preparation is complete, it’s important to choose a floor covering that’s compatible with your heating system:
- ✅ Tiles, engineered wood, laminate, and LVT are ideal as they conduct heat well and generally have a lower resistance to heat, which means your underfloor heating system can run more efficiently.
- ❌ Avoid thick carpets or non-certified vinyl as they restrict heat transfer and can make your underfloor heating system more expensive to run. They can also become damaged by heat over time.
Need Help with Your Floor Preparation for Underfloor Heating?
Looking for a helping hand with preparing your floor for underfloor heating? If you have any issues with your floor preparation or need advice for any other stage of the underfloor heating installation process, please don’t hesitate to contact us.


Comment